React Testing: Understand and Choose the Right Tools
Save time and effort with React and React Native by choosing the appropriate testing tools.
Table of contents
You finally decided to get into testing with React — great! This will be a huge step toward writing better code.
Today, I will be talking about the different solutions with regard to testing and my experience with them. Unlike me, you’ll be able to easily choose the correct testing tool without losing out on time.
No, this article won’t be a guide on “how to write a test” but “which testing tools to choose”.
Requirements
We expect you to have a basic understanding of the Node.js & Jest testing environment.
In React or React Native, you depend on the DOM or a native mobile environment. In a basic JavaScript testing environment, you don’t have access to those. Also, assertions on React components can be difficult to work with.
That’s why a few utility libraries have been introduced: in order to use React in your testing environment.
Renderer
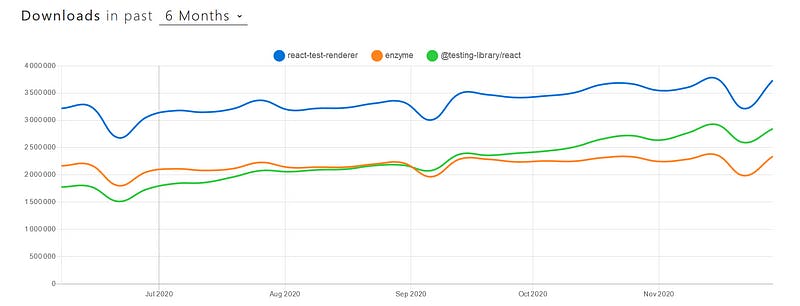
In order to test React, I had to choose between react-test-renderer, enzyme, and React Testing Library (@testing-library/react).
react-test-renderer is the most basic utility library that is shipped with React. From React documentation:
This package provides a React renderer that can be used to render React components to pure JavaScript objects, without depending on the DOM or a native mobile environment.
React Testing Library is part of the testing-library family, is built on top of react-test-renderer and is made to be a rather lightweight solution.
It provides utilities to test React and follow the idea of avoiding implementation details tests.
On the contrary, Enzyme is much more complex and heavy. It gives you a lot more functionalities but not only for the best: it becomes too easy to do implementation details testing.
If you are not sure why testing implementation details is fundamentally bad, I invite you to read more about it.
I worked with all of the above, Enzyme for the longest time. Funny enough that’s not the library I’m using now.
Enzyme worked great, was a bit hard to completely set up but that’s all. After using it for some time, I figured I had the following problems:
I needed a heavy configuration to make it work as I wanted to.
The freedom and functionalities given by Enzyme let me do a lot of implementation details testing
My configuration was breaking from time to time when upgrading modules.
That’s when I tried React Testing Library and now I’m quite sure: this is the testing library that best suits my need.
Much lighter configuration/installation process.
Almost impossible to do implementation details testing.
I never had a breaking upgrade yet.
There is React Native Testing Library for React Native.
Result
From those experiences, I now use and would recommend Jest, with assertions and mocks thanks to Jest Expect and Jest Mock Functions.
React Testing Library feels like the best solution to render React components and gives you some nice APIs to work with those components.
Bonus
If you are working on a React application I’m sure at 99,9% that you’ll be using API calls and Redux.
If you do, at some point, you’ll need to mock an API response. From all the available tools, I would recommend using Nock.
On the Redux side, a guide to basic tests is available in the official documentation.
You might have trouble if you are using Redux-Saga. Here is a really good article covering not only Redux-Saga but testing it.
Afterward
I would recommend for you to dive into React Testing Library (or React Native Testing Library) documentation.
On the other hand, you might be interested in Test Driven Development with React & React Native:
The next step is to write functional and end-to-end tests. Maybe you heard about tools such as Cypress for React or Detox for React Native:
Good luck on your testing journey.

